For our next blog post, we are going to discover Aquario's Colorist Plugin, which is a part of their new Textile Designer™ Plugin for Adobe Photoshop®.
Aquario Textile Designer™ is a new Adobe® Photoshop® plugin, creating a powerful printed textile design application. Download your copy here: https://aquariodesign.com/aquario-textile-designer/
Aquario is offering readers of my blog an exclusive 25% discount off their annual subscription! Use code BLACKFRIDAY25OFF to get the discount!
Colorist allows you to easily recolor artwork in Photoshop to create multiple colorways from a single design. You can display the colorways for different versions of the art, both for presentation or to physically print your finished files.
Color reduction is a powerful tool included within Colorist, and allows you reduce the number of colors in any design to prep designs for manufacturing. You can also use the random function to swap colors quickly and only save the colorways you like.
The auto reduction feature lets you specify a specific maximum number of colors and you can select and change them automatically.
To Use Colorist: Make sure you have updated your Photoshop version to the newest available updates from Adobe Photoshop, and install the Textile Designer Plugin from Aquario. You will want to go under the "Plugin" menu in Photoshop and make sure you have all three options checked/turned on: Aquario TD, Aquario TD - Previewer, and Aquario TD - Swatches.

Open your working file that you have already finished getting into seamless repeat.
For this example I am using a half drop watercolor floral design I had previously created:

To enter Colorist, select the "paint bucket" icon on the Aquario TD Module.

When doing color reduction, you are essentially taking your finished art from hundreds or thousands of different colors to a much smaller number. The reason most artists would need to use color reduction is to have their design print ready for a manufacturing company that uses screen printing or another process that uses limited colors. Instead of printing 100 colors, they might want your finished artwork to have 6, 8, 12, or 16 colors. This method is much more cost efficient when manufacturers are printing massive quantities of items and is pretty common when printing fabrics and other cloth based products like towels, kitchenware, and decor items.
Colorist allows you two different methods for reducing your colors- either you can do it manually or automatically.
To manually select your own colors- choose the eyedropper tool and then click around on your art to select the different shades of the colors you want to keep. I generally try to make sure to get a light, medium, and dark of each of the important colors, plus the background color. How many colors you select however will vary a lot depending on your artwork. You will begin to see your selected colors show up on the right side window.
If you'd rather the program select the colors for you, you can also use the "Auto Reduction" button ,and type in the number of colors you want in your finished artwork.
Tip: You can also go back in with the eyedropper tool and add in any colors you think are missing as well.

You can check to see how your artwork will look with your selected colors by making sure to refresh the 'Preview" window occasionally.
You can use the up/down arrow buttons that show on the bottom of the list of your select colors to rearrange them in the list. I usually like to group mine by color and putting them into light to dark order.

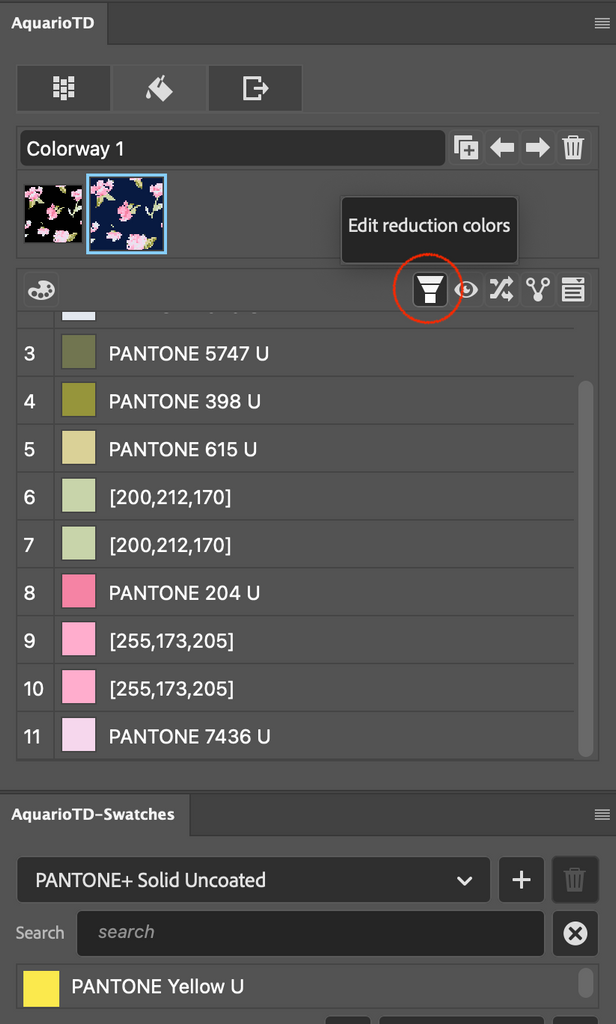
If you want to edit the number of colors of your selection prior to making any changes, use the "Edit Reduction Colors" button.
Perhaps you selected only 6 colors, but the image looks bit too muted and you think maybe it would look better with 8 or 10 colors instead. You can edit this!
You'll get a warning that any colorways already made would be lost. After this step changing the total number of colors can have adverse effects to your colorways, so do this now if you need to!

You can use the "eyeball" icon to turn colors on or off in the preview window so you can see exactly where they are in your design, as well as see how prominent they are in your art. Just select the color(s) in your list you want to toggle on or off, and click the eye.

If you're trying to reduce the total number of colors in your finished piece and you have several tones that are very close in tone, you can use the "Merge" button.

I generally use this tool to combine two colors that are pretty close in tone. You will select the two colors you want to combine in your list (holding down command key to select multiple), and then click the merge button:

In this example, I have two mauve-y rose shades of pink that are pretty similar. I select both of them, and then click the merge button. You will get a slider popup that allows you to select either color, or, to pick a shade between the two.

Tip: If you want to completely delete a color from your design, you can select the color in the list and then select the garbage can icon.
When you're finished selecting the colors you want for your design, hit "done" at the bottom
And say "DONE" when the message pops up asking you if you're sure!

The app will automatically now move you into the "Colorway" portion of the software! You'll have now a "AquarioTD -Swatches" palette as well with some new options.
I like at this point to save my original colors so I have this version before I start making any changes to the colors! The default name the software gives this version is "colorway1", but you can edit it here:

Click where the text shows "Colorway 1" rename if needed. I changed mine on this example to "Original Colors"

Then you can click the icon with the two overlapping squares with the + to add a secondary colorway. I named the second version of my file "Colorway 2" just to differentiate from the "Original Colors" version. I am going to click on this Colorway #2 when I start making changes to the colors.
If you click on the palette icon, you will open up the "TD- Swatches" menu. This comes pre-loaded with all of the default color palettes from Adobe Photoshop such as different types of Pantone colors. You can select from the palettes, and then click the "MATCH" button to have the software automatically choose the colors from the selected palette that are closest to the colors in your artwork.

You can individually change colors by first clicking on the color you want to change, then scrolling through the listed colors and finding one you like. Be sure to periodically check the AquarioTD - Previewer window to see how your selections will look on your finished repeat. You can also change colors by double-clicking on a selected color, then choosing a color with the color picker in Photoshop.
Tip: If you already have your own color palettes saved on your computer, you can import them by using the + button on the swatch palette, then navigating to their location on your hard drive.
If you have a colorway you love and want to save your progress, be sure to click the "Copy Colorway" button to save the colorway as is. You'll now have a duplicate version that shows up as "Colorway 3" in case you want to keep experimenting.
You can also manually swap two or more colors in your design by selecting the colors and clicking the "Shuffle Colors" button, which looks like two crossed arrows:

Here's a version where I swapped one of the pinks of the flower to be the new background color instead of black or blue:

You can also select ALL of the colors in list, and use the "Shuffle Colors" button to get some pretty wild colorways! Sometimes I just like to click through a few times and see what kind of different color combinations I can come up with!

Once you've finished making a few colorways that you like, you can click the "export" button to save your final images in your preferred file format(s).
This tool I think is equal parts easy to use and quite powerful! I find this method so much easier than using the traditional method of using indexing to reduce the number of colors in my finished files. I love that I can quickly see my selected colors on the preview and make changes on the fly.
Have you ever had to recolor one of your designs? I would love to hear about it in the comments! Do you think using this tool would simplify your process? If you have any questions about this tool feel free to reach out to me anytime on my socials: @TheArtwerks on Instagram or Facebook! Can't wait to hear your thoughts!

Leave a comment